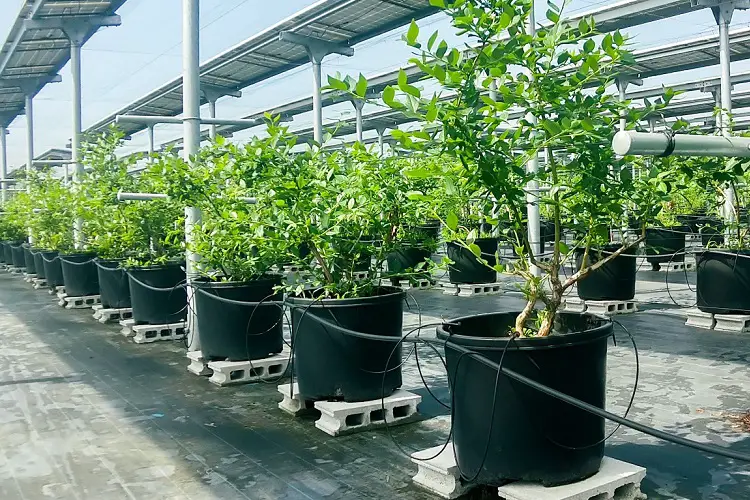
The Dutch Bucket Hydroponic System has long been acclaimed for its advantages in small and large-scale hydroponic projects alike. The system is famous mainly for its ability to fit into minimal gardening spaces and its layout flexibility, making it suitable for hobby and mobile greenhouses. It also allows the accommodation of large fruit plants, making it one of the most versatile hydroponic systems in the market.
Dutch bucket hydro systems work great in-home growing and commercial production. If you want to set up a hydroponic system and are interested in the Dutch bucket system, this is the article for you.
What Is the Dutch Bucket System?
A Dutch bucket system is a hydroponic setup comprising several connected containers (buckets) with the same drip irrigation and drainage line systems.
It is similar to deep water culture (DWC) systems in that they both use buckets. However, a DWC system fills the bucket with nutrient solution and an air stone. The Dutch bucket system fills the bucket with inert growing medium and the nutrient solution is pumped into the bucket from a separate reservoir.
Often referred to as “Bato” buckets, Dutch bucket systems are renowned worldwide as one of the most efficient and simplest hydroponic systems to set up. Bato buckets are variations of media bed systems, breaking the conventional media beds into smaller elements (buckets), allowing larger crop spacing without any media wastage.
The separate buckets also allow for easier pest management, as you can easily separate infected crops from the healthy lot without dismantling the entire setup. The Dutch bucket system also makes plant training [1] easier and features nutrient drip feeding.
How Does the Dutch Bucket System Work?
The Dutch bucket hydroponics system primarily depends on water circulation, drainage, and their respective schedules. First, a few buckets/containers are connected to a dedicated reservoir through a drip irrigation system. Secondly, depending on the crop you’re planting, an inert growing medium, such as perlite or expanded clay pebbles, is added to the containers. The drip system is installed with the emitters conveniently located on the mouths of the designated containers.
Water is then appropriately mixed with sufficient hydroponic nutrients and added to the reservoir, and a water pump is fitted to distribute the water evenly to the buckets. The watering schedule may vary widely depending on the crop and individual growing techniques.
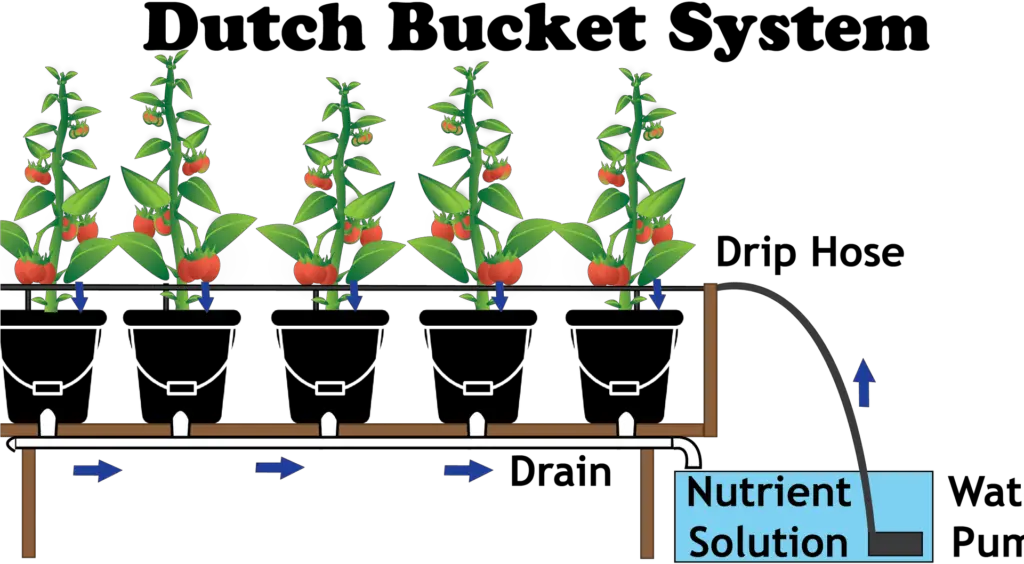
Two drainage techniques are applicable in the Dutch bucket system: the recirculation technique and flow-to-waste irrigation. Recirculation involves recycling the wastewater through the system several times before a full dump. The flow-to-waste irrigation technique dumps the water after the first usage and is preferred for crops with calibrated nutrient needs.
DIY Basic Dutch Bucket Setup
Having determined the right growing location and carried out water tests [2] to ascertain your water does not require extra filtration, you can set up your Dutch bucket system.
What Do You Need To Build a Dutch Bucket System?
Dutch bucket systems vary widely depending on the grower’s preferences and the crops you’re planting. Here are some of the most essential components to have when setting up a DIY (do-it-yourself) Dutch bucket hydroponic system:
- Buckets (11lts)
- Flat table or floor space
- 5 ft PVC tubing with one elbow and one cap
- Drip emitters
- Reservoir tank (about 30 gallons)
- Simple submersible pump
- Connections and fittings
- Hose clamps
- Rubber grommets
- zip ties
- Siphon elbows (per bucket)
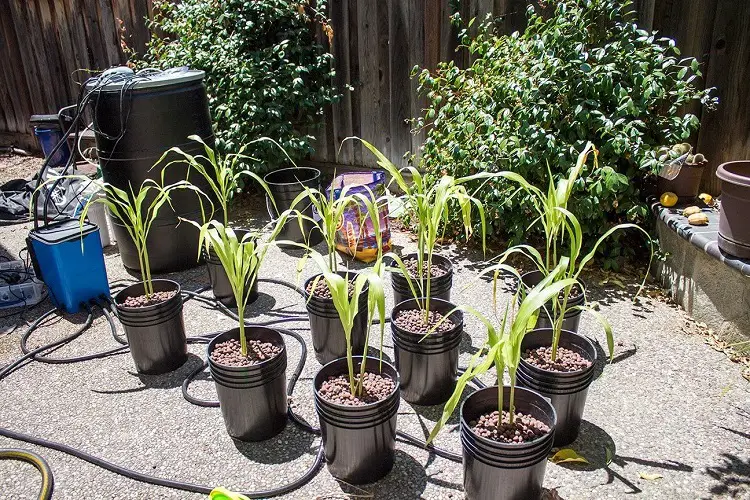
- Growing media
The type and length of some of these items will depend on your preferences, availability, and the crop you choose to grow. Most hydroponic farmers start with six or eight buckets and a 30-gallon reservoir tank and scale up with time.
How To Build a Dutch Bucket System
Here is a step-by-step process for building your DIY Dutch bucket system:
- Cut the PVC pipe to a length that can run through the setup and act as the drainage. Tilt it to ensure water flows out of the pipe and into the reservoir without it flowing back.
- Place your buckets on opposite sides of the drainage pipe, spacing them accordingly to fit the length of your PVC drainage pipe and the needs of your crops.
- Drill or cut holes on your PVC pipe under each bucket such that every drop is collected in the drainage.
- Drill holes on the sides of your buckets about 2 to 3 inches from the bottom to match those on your drainage line, then fix rubber cringles to each hole.
- Fix a PVC elbow to the end of the drainage pipe where your reservoir will be, and turn it to face down. Benches could help raise the setup above your reservoir or install it underground for gravity to take effect during drainage.
- Cut PVC pipes of even length to connect your buckets’ drainage to elbows.
- Fit the pipes to the holes drilled on the buckets (step 4) and fit PVC elbows facing down on the end of each tube.
- Select and place your growing media in your buckets to surpass half your bucket’s volume slightly.
- Plant your crop in the buckets per your planting guide.
- Mix in your fertilizers (nutrients) in the appropriate proportion with water.
- Place your drip emitters over each bucket and fasten them using zip ties so your solution doesn’t spill.
- Connect your drip tubing to a simple submersible pump and place it inside the reservoir to pump water to the emitters placed over each of your buckets.
What Grows Best in Dutch Buckets?
Depending on your gardening needs, different plants do best in Bato buckets. They include:
Tomatoes
Tomatoes necessitate a tighter watering schedule and pest management system. They can grow as tall as 30 feet and have a higher nutrient demand than other horticultural crops. The Dutch bucket system allows each tomato to occupy a bucket, maximizing the availability of nutrients and minimizing competition and the spread of diseases.
Strawberries
Similar to tomatoes, strawberries are very demanding in terms of nutrients. They do not grow to extreme heights and could do well in other hydroponic systems. Nevertheless, they are more productive when planted in Dutch buckets as the nutrient levels are optimum due to the improved spacing.
Cucumbers
Cucumbers produce fast yields but require selective breeding to optimize productivity. You must control insects such as bees to maintain a high production batch. It’s easier to control pollination with increased spacing options in Dutch buckets.
What Growth Medium Works Best in a Dutch Bucket Hydroponic System?
The crop you’re growing will mainly dictate the substrate you’ll use. There are several options available when it comes to growth media.

They include:
- Hydrokorrels (Expanded clay pellets)
- Coconut chips/coir
- Peat
- Vermiculite
- Perlite
- Rockwool
The appropriate water retention capacity for optimum crop growth conditions influences substrate choice [3]. Carry out some research on the right water retention and drainage for your crops to produce healthy and productive crops. For instance, strawberries [4] thrive well in less porous media (about 15%-20% porosity) such as hydrokorrels, coconut coir, or rock wool.
You may also mix your substrates to create the optimum crop conditions. A University of Arizona research indicates that mixing mediums in various ratios compared to a single medium could achieve higher productivity [5].
What Is the Best Watering Schedule in a Dutch Bucket System?
Drip schedules are often challenging to keep up with. Nevertheless, you must maintain a healthy drip schedule for sustainable productivity. You should provide your crop with the right measure of water and nutrients through different seasons.
As fortune would have it, technological advancements now allow hydroponic growers to keep up easily and customize their drip schedules based on various plant needs, weather, and season.
With smart plugs, your Dutch bucket hydroponic system can seamlessly connect to your device for easy monitoring and schedule automation. An ideal starting point for most crops is setting the drip intervals at six hours and then reducing or expanding it depending on your plant’s size, condition, and season. In most hydroponic systems, the concern is more on under-watering than over-watering, as the excess water goes back into the reservoir.
The Pros and Cons of Using Dutch Bucket Hydro Systems
Let’s evaluate the benefits and drawbacks of the Dutch bucket system.
The Pros
- Versatility: Dutch bucket systems are a favorite among growers since they allow them to scale up their hydroponic farming easily. All they need to do is add another bucket to the setup and increase the nutrient distribution rate to support the extra crops. This allows a farmer to begin hydroponic farming on a low budget and gradually scale into a bigger garden.
- Accommodating large plants: Growers opt for Dutch bucket hydroponic systems because of their ability to accommodate larger plants. Most hydroponic systems are designed only to accommodate small plants. However, with a Dutch bucket system, you could grow larger fruit plants as the buckets allow ample room for larger plants and can be spaced apart to accommodate the canopy of larger crops.
- Easy to set up: Dutch bucket systems are a great DIY option, with most components readily available at local stores and around your home. A typical Dutch bucket system DIY project will utilize PVC pipes, buckets, plastic bins, a pump, and irrigation tubing. Building a DIY hydroponic drip system could save you significant investment capital, which is particularly attractive to beginners working with a limited budget.
- Conserves water and nutrients: The Dutch bucket system allows the solution to circulate a few times before it is dumped, allowing for optimum nutrient take-up.
The Cons
- Higher risk of pests and diseases: Water and nutrient recirculation pose a risk to pest and disease spread. Whenever water is contaminated, the infection is easily spread to other plants through recirculation.
- Requires frequent monitoring and care: The Dutch bucket system requires consistent nutrient and water level monitoring which maintains optimal productivity. The system also needs you to make frequent adjustments to the level of nutrients to support plant growth in different stages.
Bottom Line
Modern agricultural systems are quickly taking root and are becoming favorites in resolving conventional farming challenges. Dutch bucket systems are arguably the cheapest and most efficient hydroponic farming systems available today. They demand a small initial investment and provide significantly better crop-growing conditions than other alternatives.
The Dutch bucket hydroponic system DIY is easy to set up with the above steps. It’s suitable for growing on-demand crops such as tomatoes, peppers, cucumbers, strawberries, and many more. Whether in small-scale or large-scale hydroponic systems, the Dutch bucket hydroponic systems are perfect to start with and scale up your farming.
References:
- https://horticulture.tekura.school.nz/plant-management/plant-management-1/ht1101-plant-management-1-study-plan/plant-training/
- https://extension.psu.edu/interpreting-irrigation-water-tests
- https://www.sciencedirect.com/science/article/pii/S0304423822006963
- https://strawberryplants.org/growing-strawberries-indoors/
- https://www.researchgate.net/publication/347074982_Evaluation_of_four_soilless_substrate_systems_for_greenhouse_strawberry_production