There are countless ways of building hydroponic systems, and there are many growers who opt for each of the various kinds. However, some new growers look for simple systems so they can test the waters and see if hydroponics is actually for them.
One system stands out. A floating raft system is simple to construct and takes minimal materials to do so. While it is easy for new growers due to its simplicity, this type of system can be scaled all the way up to commercial farms, albeit with better-suited equipment.
Here, we will take a look at what these raft systems are, and how you can build one. We will also look at any other relevant information such as the types of plants you can grow, and how you can make sure you don’t fall into any problems.
What is a Floating Raft System?
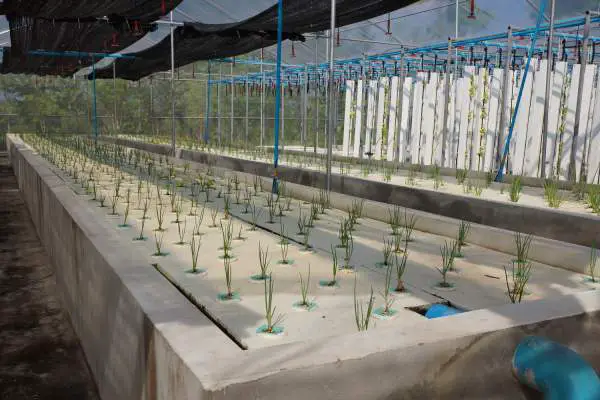
In the purest form, a floating raft system is no more than a container where you can hold your water and nutrients, and sitting on top of this is a floating raft where you can carry your plants. In the tank, you would have an air pump to oxygenate your solution to make sure your plants don’t drown.
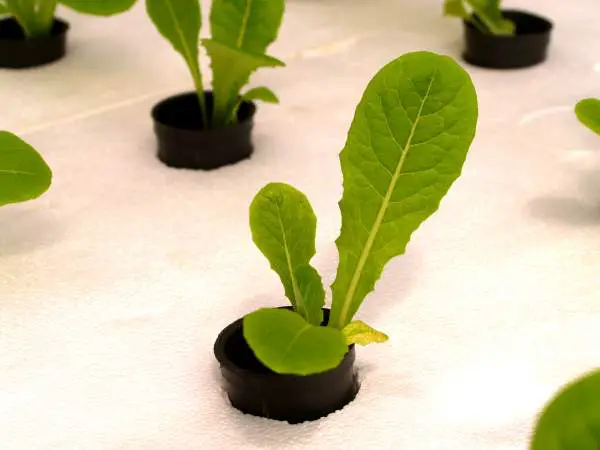
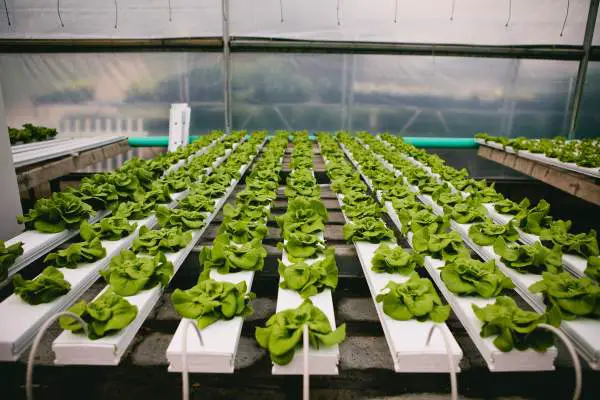
These raft systems are fantastic for fast-growing, leafy greens. Plants such as lettuce and spinach fall into two of the common varieties, but there are many more. The most significant downside to plant types is that it isn’t suitable for larger plants because there will be little to support them.
A raft system is almost the same as a conventional DWC system aside from the floating raft whereas a DWC system has a fixed lid.
Float System Principals
As easy as these systems are to use, there are some principles that growers must stick to. Here is an overview of what growers contend with.
Plant suffocation

Plants can very easily suffocate if there is a lack of oxygen around the root zone. They can either take this up from the gas in the air (O2). Or they can take it from the dissolved oxygen from any surrounding moisture, in this case, it would be the water in the tank.
Without this oxygen, the plants wouldn’t be able to take up any nutrients where the roots die off, and then the onset of pathogens like Pythium can quickly attack.
In growing substrates, there will be atmospheric oxygen at high levels, while a nutrient solution can maintain between 6 to 13 ppm of O2 at full saturation. This does depend on temperature, and the warmer the solution, the less oxygen any water can contain.
For this reason, it is vital for any grower to maintain as high a level of oxygen in their solution as possible, and this in many cases comes from air pumps and air stones. While water circulation can be used to dissolve oxygen into the water as it cascades back into the tank and creates bubbles.
Nutrient Solution Management
This is the second area where growers need to pay close attention. While the large volume of water/ nutrient can act as a buffer for slight temperature changes, EC, and pH levels, they do require continual monitoring and adjustment. Over time, this can go out of balance as plants take up more water than nutrients.
When this happens, there can be a buildup of salts as the water reduces leaving the nutrients. To cater for this, small growers can manage these levels by a partial or complete replacement of their solution (system flushing).
As these levels can be affected by temperature (water evaporation), growers in warmer climates may need to use a chiller to keep their solutions at the ideal temperatures, if this doesn’t happen, it can be hard to grow vegetables such as lettuce.
Nutrient Pool Depth
This is another important area. Where some growers use shallow tanks with an average depth of 7-8 cm, it has been proven that these don’t deliver consistent growth. When the tanks are an average depth of between 12 -23 cm deep, these offer better buffering capacity and are more productive.
One thing to bear in mind is, while some hydroponic raft systems work on the principle of topping up nutrients to specific levels during crop growth, there is the other train of thought in nonadjustable systems. In this type, there will be no addition of water or nutrients throughout the crop’s growth. It will only be after harvest where the nutrient solution is replaced, the system thoroughly flushed, and new plants are transplanted.
Hydroponic Float System Drawbacks
The rapid spread of disease is one of the most significant drawbacks of this kind of system. Root rot pathogens such as Pythium can quickly set in. Once these show signs there are free-swimming zoospores that will build up inside the solution. Even with a system that has circulation, this disease can infect all of the plants. It has been known for a full garden to quickly become infected.
While smaller growers will only have one or two float systems, commercial farmers often separate their tanks to alleviate this problem. With this, if one becomes infected, then it can’t pass to any of the other tanks.
To help prevent this, it helps to make sure temperatures are in range, your EC levels are at the optimal levels, and there is sufficient oxygenation. This helps the overall condition of the plant’s root health.
Building a Raft Hydroponic System
Basics of Building a Small Hydroponic Float System
A hydroponic float system is ideal for an indoor garden where space is limited. They can also be very useful where a crop needs different EC levels than others.
The very basics of what is required is a nutrient pool where the plants will float. This can be any simple container (food safe) that has a depth of around 4 to 6 inches.
The length and width will depend on the number of plants you wish to grow. As an example: medium-sized lettuce has a spacing of 8 to 10 inches square, but, smaller leafy greens and herbs can be grown with a much higher density.
When building your own float system, there is no limitation to material choice. Some growers have even used children’s paddling pools, regular fish tanks and aquariums, food storage containers, and even plastic-lined timber frames. In fact, anything that you can use which is leak-proof, light-proof, and above all, the level will work.
Floats are usually made from closed-cell polystyrene. This is readily available from hardware stores. The polystyrene needs to be should ideally be around 1 – 1.5 inches thick so it can deliver the maximum flotation. Additionally, the float should be restricted in size so it can be easily lifted at harvest time.
Materials and Equipment Needed
Materials
- 1 x Air pump + 6 ft. of air tubing (black so no light can enter)
- 1 x large air stone that produces small bubbles (you can use multiple if air pump has 2 or more outlets)
- 1 x 14-gallon container for the reservoir (black so no light can enter)
- 1 x 2ft x 2ft x 1.5 inch polystyrene foam sheet
- 9 x net cups
- 1 x small bag of growing medium (expanded clay pebbles)
- 9 x rooting plugs (Rockwool) for seed starting/ germination
- 1 x 1/4inch compression grommet
- Hydroponic nutrients (3 pack solution)
Equipment And Tools
- Electric or battery powered chuck drill
- 3/8” or 1/2” chuck bits
- 1 7/8” hole saw bit for cutting plant sites (can do this manually but very awkward)
- 3/8”drill bit (drilling the grommet hole)
- Jigsaw or coping saw for cutting foam (not necessary if you have another means)
- Sharp knife for cutting air pump tubing
- A good marker pen
At this stage, it should be noted that the choice of the container can make this very easy, or very difficult. Try to find one which is as rectangular as possible, and without any indentations around the sides. The foam needs to easily fit inside with minimal gap. If your container isn’t a regular shape, you do need to cut these shapes into polystyrene.
Instructions for Building a Hydroponic Raft System
- Carefully trace the outline of your container onto the Styrofoam/ Polystyrene sheet. This should leave a couple of millimeters gap around all of the edges. This is the step that can make it easier or harder depending on the shape of your container.
- Carefully measure the distance from the outer edge of your container to the inner wall. You need to allow for any insets (handles) which go down the insides of the container. Some also have large ribs for strength. A smooth sided container is much easier to work with.
- When you begin cutting the polystyrene, you need to ensure it has free travel inside the container for about 4 – 8 inches. This allows for any drop in water levels. You may also need to allow for a little deformation of the container once it has been adequately filled with water, this can affect the shape. Check the raft to make sure you have the ideal gap.
- The next step is to layout your plant sites. As we are using 9 net pots, this will be three rows of three. Leave sufficient space between each one and pay careful attention to the outer holes, so they are well away from the side of your tank. Once you have marked these out, use the (1 7/8 inch) hole saw to cut the holes. Cutting them manually can be done, but, it is very awkward and time-consuming.
- Because most plastic containers come with a taper, make the lowest point this will be. When nutrient levels drop, if you don’t top up when it reaches here, the roots will have no chance of reaching the water. This can quickly be done by placing the polystyrene inside your empty container and taking the marker pen. Just mark along where the polystyrene sits. Do this in a few places in case the pen mark comes off the plastic.
- This is the first critical step. You need to drill a hole in the side of your tank toward the bottom of the end wall. Use the 3/8 inch drill bit and then insert the compression grommet. You then take the air tube and feed it through. One end will connect to the air pump, and the end inside will connect to the air stone. There is another solution to this, and it is to allow for the tube to pass by the raft, you can then get away from drilling this extra hole. One other thing to be careful of is the air pump must sit higher than your solution level. If it is at the same height, you could have a nutrient solution working its way toward the pump.
- That is basically the only steps that are needed to build a raft system. All that is left is to germinate your seedlings until the roots begin showing from the bottom of the Rockwool plugs. Once they are a suitable length, you can seat them inside your net pots, and then backfill around the top with your expanded clay pebbles. These give support to the plants as they grow.
- When you are ready, you can fill up your system with water and your nutrients and test the pH levels. Once all your seedlings are replanted, then you can turn on the lights and sit back to watch how fast your plants to grow. When the solution drops between 2-4 inches, you can then top up.
One thing to be careful of is that as the plants are taking up fluids, your EC levels will be increasing. Ideally, you should measure these, but if you are unable to, you can top up with freshwater, or you can top up with quarter-strength nutrients. This will be the time you need to pay close attention to your plants. If the solution is too strong, they will be showing signs of nutrient burn. It is advisable to feed them on the weaker side as it is easier to adjust up than it is to adjust down. It also causes less harm to plants if the nutrients are a little on the weaker side.
Choosing the Right Crops for Your Floating Raft System
While this type of system is basically a DWC system, there can be differences in the crops that can be grown. There are several factors you need to consider, so here are a few pointers that will help you decide.
Weight
A regular DWC system has a fixed lid, whereas a raft system uses a polystyrene foam board that is suspended on top of your solution. While they are both durable and highly affordable, they can only take up to a certain weight once your plants begin growing.
Small and lightweight plants are ideal. Lettuce is the prime example, but that isn’t the only crop you will want to grow. Plants such as tomatoes grow top-heavy, and without their roots holding them onto something, they will easily topple over. In the worst case, they will break the stems, and you will have lost the entire plant.
Volume (Footprint)
Because you are growing on one single plane, you will have limited growing space. Not only do you need to consider the layout of your growing area, but also your crop density. While in the example we used 9 net pots, this doesn’t mean this is as compact as you can go. The grow sites need to be based on the plan size at maturity, but you do also need to leave enough space in between and the sides for them to get light and grow.
Water-Friendly Plants
Some types of plants like wet conditions, others not so much, there are many types of herbs that prefer drought conditions so these won’t fare well in a raft system. Be sure to make sure you do choose plants that prefer these types of conditions.
With the above information, here are the recommended crops to grow in raft systems.
Lettuce
This is one of the most popular crops for any hydroponic system around the globe. Although it might get boring growing this all the time, it is one of the most adaptable and one of the fastest growers. The overall grow time from seed is around 5-6 weeks. Also, there are a vast amount of varieties you can grow, so fresh salad lettuce doesn’t only mean you only need to grow one.
Kale
Being classed as a superfood, this is becoming very popular. It can grow in the same 4-6 week window as lettuce, so it does make an excellent companion crop. One advantage of kale is you can take up to 30% of the leaves without harming its growth, so after a few weeks, you can take some as needed before the actual harvest time arrives.
Bok Choy
Chinese cabbage as you may know it is also highly popular. This does though take an extra few weeks to mature and will fall into the 8-11 week window for maturity. The only downside to this is that there are various strains that are not entirely suitable for DWC growth. Some are also a little heavier, so you do need to pay attention to how your raft is sitting on the water.
Collard Greens
Taking between 7-8 weeks from seed to maturity, these are just a little slower than lettuce. They are super healthy and adorn many a dinner table. What you may not realize is that both broccoli and cabbage are a part of this family. Some growers don’t like to wait so long for harvests, but it can be a good challenge as long as you keep an eye on the size and weight of your crops.
Conclusion
As you can see from above, a raft hydroponic system is very cheap to build, and all told you can do so for a minimal investment. The most significant cost is your air pump, and with everything else costing next to nothing, you can quickly be on your way to producing healthy crops.
A raft system is also one of the easiest to maintain once it is set up and running. As long as the guidelines are followed and you pay attention to your pH/ EC levels, apart from disease, there isn’t much else to go wrong. A failed air pump can be one of the most testing times, and because of their cheap cost, many growers actually have a backup pump just in case.
In a small area, you can easily have one or two different raft systems growing various plants. This gives you plenty of diversity, and the list of recommended plants to grow is far from all that is possible. For any new grower, this is the most straightforward system you can make, and it can be done so in less than an afternoon.
Related Posts
Oscar Stephens
I am a gardening and tech enthusiast! Stumbling across the world of Hydroponic Gardening, Aquaponics, and Aeroponics by accident I've decided to create this website to put all of the best information I can find in one easy to navigate place. I'll continue to add more content as I discover new things!