Every grower knows what it means to keep their hydroponic grow room clean and tidy. Because we grow plants in sterile environments, any sign of bacteria or algae, or pathogens can quickly ruin a crop of plants in a matter our hours or a few days.
While these growers keep their areas as clean as possible, there are the systems themselves that need tending to. It is at this stage that keeping clean isn’t enough, and a hydroponic system will need more than sanitizing.
Sterilization can make all the difference when you have finished one harvest and are preparing things for another.
Here, we will look at how important it is to keep growing areas clean and what the difference is between sanitizing a system and sterilizing one thoroughly. With this, we will look at the materials you need, the cleaning agents you require, and how you need to use them in safe effective ways. To finish we will go through the entire cleaning process.
We will also look at some does and don’ts and anything else which may be relevant to cleaning your growing room.
Why Keeping Clean is Important
While the health of your plants is crucial, the one most significant reason for cleaning grow rooms is the health of everyone who will use the bounty of a successful harvest. Human health is the top reason for performing these regular cleanings.
Other reasons to keep clean and sterile, are growers who already are or aim to have hydroponic systems for commercial ventures.

There will be certifications and standards that need upholding.
Sanitization Vs. Sterilization: What’s the Difference
There is often confusion between the two, but sanitizing and sterilizing a grow room and system, are different in their approach and the end results.
Sanitization is the ongoing maintenance, and in the most basic form, it is seen as keeping things clean and tidy.
Spilled water, dead plant matter, air intake filters are all part of this regular maintenance, and they will have an overall effect on your system performance.
All these three areas are breeding grounds for bacteria, and if not cleaned up, they will quickly spread to your plants.
Once you look at sterilization of a system, it is more in-depth, because this involves the cleaning of the physical system, along with all the other components of your growing area.
When performing sterilization, you rid the entire growing area of viruses, bacteria, fungi, and microorganisms.
In the times you sterilize your system, you prevent any pathogens or forms of mildew from spreading.
Most times, sterilization needs to be performed after a harvest.
If you have a separate growing area where to move your plants while sterilizing, this is ideal. However, this for many is a luxury and not always possible.
There is a difference between the two, and growers should never think sterilization alone is sufficient.
In between these times, there is still a need for sanitization.
Both are required, and they will make use of different materials and processes.
Materials Required for Sanitization and Sterilization of Hydroponic Systems
When you are planning to clean your system, you will need a certain set of tools, and cleaning agents to rid your system of microorganisms.
Tools Required
- Sponges and green scrub pads
- Stiff scrubbing brushes
- Bottle brushes
- Long handled brush
- Mop and bucket
- Rubber gloves and goggles
- Clippers and scissors – removing dead plant matter that has not fallen
- Wet/ dry vacuum – optional
- Clean rags
- Compressed air cans – great for cleaning ventilation grills on ballasts and control units
- Spare buckets
- Garden hose with female hose adapter
Cleaning Agents Required
- Hydrogen Peroxide – food grade
- Bleach – unscented
- Isopropyl Alcohol
- Glass cleaner – you can use this, but we prefer either alcohol or vinegar
- Vinegar – optional. Vinegar makes a great organic sanitization cleaning agent
Dos and Don’ts of Sanitization and Sterilization in Hydroponic Systems
Even following all the steps for cleaning your hydroponic system, there are some dos and don’ts you need to know of. These can not only harm your plants but also harm you if you don’t take the right precautions.
Here are a few things you need to do and don’t do when sterilizing your system.
To Read the Label
While the cleaning agents may appear harmless to a certain degree, this isn’t the case. You will find health and safety information on the chemicals in use. Be sure you read the labels and fully understand the risks involved for you, and for your plants.
Do Make Sure Safety is Top of Your List
No one enjoys wearing goggles and rubber gloves, but when using these chemicals, it only requires a splash into the eye to cause irritation at best. If you are using a chemical that is too strong, this can kill your plants straight away, and it can lead to injury.
Rubber gloves are crucial as they can prevent chemical burns when using high concentrations of these cleaning compounds.
Do Know Your Solutions
Even after reading bottle labels and wearing the right protective gear. You need to understand the chemicals you use.
A prime example is hydrogen peroxide.
The food-grade variety has a stronger concentration than bottles you can purchase in the supermarket.
This variety only lowers its concentration when you dilute it, and until then, it is dangerous.
Don’t Mix Chemicals
It may not be intentional, but you need to make sure, you never mix any chemicals. The main one you need to take caution with is bleach. This doesn’t take well to being mixed with any other liquid. Something as simple as vinegar when mixed with bleach can create chlorine gas; this can cause many symptoms that can be harmful.
Don’t Use Concentrated Solutions
If you add anything to your tank while you have plants in your system, you should never add anything within strong concentrations. Although you can use hydrogen peroxide in a running system, you must make sure you follow the recommended levels. Vinegar might appear harmless, but even this can damage your system. Bleach should never be added to a running system that has plants growing.
Food Grade Hydrogen Peroxide
Although you can purchase hydrogen peroxide in different strengths, you need to make sure this is ‘Food Grade.’ This means, they classify it as safe for humans, and contain none of the compounds such as acetanilide which prevent the liquid from breaking down.
However, you do need to take caution when using full strength 35% hydrogen peroxide.
It will burn when it is exposed to the skin. Using rubber gloves is still a recommendation when handling any quantity of hydrogen peroxide.
It is for this reason; you need to dilute this down to a 3% solution before use. For cleaning, you mix one part 35% hydrogen peroxide with eleven parts of clean water. This will be safe on all areas you wipe down, and safe for your plants.
Areas to be Cleaned in Hydroponic Systems
When you come to clean your system and grow room, it is safer to do so in between harvests. This means there is no risk of your plants becoming stressed, or any of your cleaning chemicals causing problems. It also gives you a chance to go through each part of your system one by one.
The extent of cleaning will vary depending on the size of your growing room, and the types of system you have. Although these will differ, the cleaning methods will be the same.
One tip to remember is that it is much easier to begin at the top and work your way down. There is little point in cleaning your system than disturbing dust that will fall onto your clean surfaces.
Remove Plants
If you have plants in your growing area, you should move away from the areas you are cleaning. If you do this, you need to make sure you are using the same growing medium, the nutrient levels are the same and your solution has the same pH level.
It will introduce a lower amount of plant stress when you replicate their growing conditions. You will see it is far easier to do this cleaning in between harvesting.
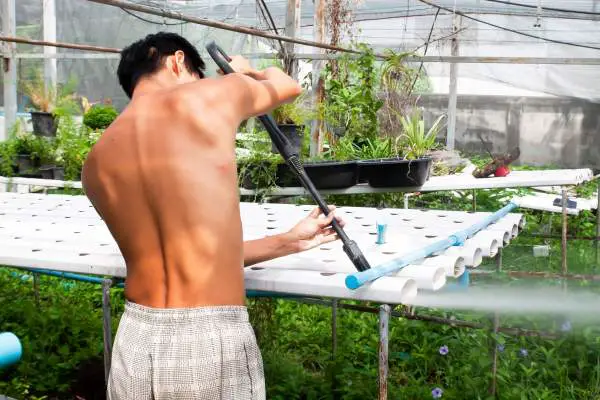
Walls and Work Surfaces
You should scrub all walls and work surfaces. You can use water and hydrogen peroxide or vinegar for this. It is worth wiping down a first time to remove dirt before wiping down a second time to disinfect these areas.
Lights
Your lighting in most cases will be the highest element in your system.
You may not think it necessary to clean these, however, they are areas bacteria can grow and are prime areas for collecting dust.
In the extreme case, you will have ballast, reflectors, reflector glass, and the bulbs themselves. All these components will benefit from a wipe-down with a damp cloth. This will remove any settled dust.
When you come to sterilize, using glass cleaner on the glass can leave a residue. It is far more beneficial to give all your lighting components a wipe down with Isopropyl alcohol to sterilize them thoroughly. The bulbs or tubes should be removed and wiped down in the same way. Although you can use vinegar, the alcohol evaporates faster and doesn’t leave a residue or streaking.
Electrical Areas
Regularly, you should clean the areas around electrical units either using an air compressor or using the cans of compressed air they use for cleaning computers.
Equipment that benefits from regular blasting of air is your lighting ballast, fans, lighting timers, heaters, air conditioning units, and dehumidifiers.
All this equipment has hard-to-reach areas that a damp cloth can’t reach. This does more than clean your equipment; it will improve their efficiency and prolong their effective lifespan.
Air Intake Filters
Although many hydroponic air intake systems will bring in the fresh air, this doesn’t mean it will be directly from the exterior of where your grow room is installed. However, no matter where your air intake comes from, the filters will need to be cleaned. These need to be cleaned and washed at least once per month, this removes any dust and bugs as well as improves the efficiency of your intake system.
It is worth changing this on a regular basis to make sure you have the chance of clean air entering your grow room. You can use nylon stockings for intake filters. You can stretch these across openings, and they will provide a cheap, easy, and disposable intake filter that you can change weekly.
Full System Cleaning and Sterilization
While all your work areas will make your grow room a much cleaner and healthier environment. You need to pay careful attention to the system itself. It is here which has direct contact with your plants, so making sure this is as sterile as possible is vital.
For cleaning your system, you need to remove your pots and growing medium. This will have separate attention. If using Hydroton pebbles, make sure these remain wet and don’t dry out.
Step #1 Draining Your System
The first step in cleaning a system will be draining the current solution from your tank. While there are some systems that don’t use pumps, for example, we will use a recirculating system. You can drain your system in two ways if your tank has a drain valve. If you are only using a pump, then you will only follow the pump method.
Return Pump Method: Turn off all electricity to your system and take the pump from your tank. You will need to remove your outlet pipe and connect the female connector to your pump. When this is connected, you can feed your hose to the desired drain point. When ready, you can turn on your pump and pump the water from your tank.
Once the water reaches the level of your pump, you need to make sure it doesn’t run dry. This will cause wear and damage. You need to turn off your pump.
Drain Valve Method: You follow the same principle as the pump method, but you use the drain valve to let the water run from your tank naturally. Your drain area in this method does need to be lower than your tank.
If you have a non-circulating system and your drain point is higher, then there is no other way to empty your tank than using your empty buckets.
Using the above methods will leave around one inch of water in the bottom of your tank. This needs removing by using a sponge and squeezing into a bucket unless you have a wet and dry vacuum.
Step #2
This stage is crucial after each harvest in case there are any bacteria, algae, or pathogens lurking around your system. You can use one of two chemicals at this stage, although if using bleach, requires extra care.
All chemical residues need removing before re-starting your system; this will require sufficient rinsing of all components of your system.
The ratio of sterilizing chemicals are:
- Food Grade Hydrogen Peroxide: 35% concentration should be mixed 3mls per each gallon of water
- Unscented Bleach: 1:100 ratio mixed with water. (1.3 oz. bleach to 1 gallon)
System Cleaning
- Drain your system by either of the two methods mentioned above.
- Remove any Air Stones: One recommendation is to replace your air stones each time you sterilize your system. This may not be workable for small system growers.
- Check all areas of your system and remove any debris, broken off roots or signs of algae growth.
- Use the sterilizing solution to wipe down your air hoses, tank lids, and other external areas with green scrub pads or clean cloths.
- It is advisable to change your 3/4 inch water hose. In most systems, this will be short so there are no significant cost implications.
- Fill your system with regular water and your choice of sterilizing solution (Hydrogen peroxide or bleach).
- Fill to just over your regular water level, as this will cover the line where algae growth can occur build up.
- Let your system run and circulate for between 4-6 hours.
- Scrub as many parts of your system as you can reach with your green scrub pads. This includes channels (PVC pipes), flood trays and buckets if using those kinds of system.
- All joints or hard to reach areas need scrubbing with a bottlebrush.
Note: Because it may be possible for bacteria growth during your growing phase, they recommend stripping down parts where you can’t see, and using bottlebrushes to reach inside as far as possible.
- Rinse out your system with fresh water. You will see lots of residue being washed around the system. All this should end back in your tank once you have scrubbed all the areas you can, as you flush your system, you must drain your system to prevent this debris re-circulating.
- If you are using bleach as your sterilization solution, you need to triple flush your system to get rid of any residue that may cling to the sides of your system.
- Drain your system of all water.
- One your system is free from any water; wipe all parts with a clean towel.
- To assist drying, use fans and turn on your HID lights if you have these as it can help with sterilization. Ridding the system of excess water at this point will stop any bacteria hanging around in standing water droplets.
Read more: How to Get Rid of Algae in Hydroponics for Good
Sterilizing System Components
Once you have cleaned your system with the above methods, you will need to turn your attention to other system components. These will be your pumps, pots, and growing medium. We recommend Hydrogen Peroxide to clean your system, because of its effectiveness and not needing to rinse as many times.
For smaller components, you can make a bleach bath. This will be a 1:1 mixture of unscented bleach and water. Once you have this, you can soak your pumps, Hydroton pebbles, and net pots. If you decide not to discard your air stones, you can soak these in your bleach bath.
Like your system, you will need to triple wash these items before introducing them back into your system. The difference is, you will be using nowhere near as much water.
Cleaning Excessive Salts from Hydroponic Systems
The mineral salt build-up is another key area that requires cleaning. Nutrients not taken up by your plants build up around areas where water levels stop and evaporate. A good example is a flood and drain system. Pots and growing mediums are places where these salts build up.
The Problem with Salt Buildup
These salt buildups will cause problems for your plants, if you top of your tank, you will add more nutrients, this adds to the salts already in the system, and you quickly find your plants are getting nutrient burned. This can be hard for new growers to rectify, as there are many symptoms that can lead them in the wrong direction.
While you are sterilizing your grow room, this is the ideal time to rid your system of all these salts before you plant your next crops. This will mean you have a clear route for your new nutrient mixes and there won’t be any miscalculation because of the mineral salts still in your system.
Dealing with Salt Buildup
We need to remove as much of these salts as is possible from the rooting medium. We do this by leaching or flushing the system. To do this, there is a large amount of water allowed to flow through the system in the shortest time.
This action dissolves the salts and drags them away from the areas where they have settled. In different growing mediums, the number of salts that accumulate will vary. Hydroton pebbles and perlite retain less water than coco coir or Rockwool, so these two will require less water to flush out these salts.
During a growing season, it is hard to determine when you need to flush your system. However, experienced growers recommend flushing once per month to be on the safe side. This is more the case with heavy feeding plants because they will have more nutrients being drawn to their rooting systems.
This regular flushing helps prevent any problems, but it can make it harder to maintain correct nutrient levels with no adjustment.
Making Sure Salts are Removed
One of the best times to remove these salts can be during your sanitization phase. Your pots and growing medium can be flushed separately in your bleach bath, as it will require triple flushing. Before cleaning your growing medium, you do need to make sure there are no root remains remaining inside, as this helps bacteria form.
One of the best ways to tell these salts are being removed from your system is to use an EC (Electric conductivity)/ ppm meter.
Check your system TDS levels before flushing, or rinsing your system, and then check after you have run it for a period. You should see the ppm of the TDS has risen. This means the salts have dissolved again and are back in your water.
During this flushing or leaching (either with or without plants), check the water line where water evaporates. Flood trays and up the sides of pots will have visible signs in the form of white lines where salts are. All these need cleanings so they can return to your water.
You can then finish your rinsing and tank draining. Once your system is dry, there should be no traces of this salt buildup.
Even if you perform this action during a growing phase, your plants can show positive signs of growth after a couple of days. You can then return to your regular schedule of fertilization.
When you perform this flushing as part of your system sanitation, it will be much easier to get the correct nutrient/ pH levels. There will be no traces of salt interfering with your readings.
The Ultimate Grow Room Sanitation
You should follow all the previous steps, but, there is one way a grower can ensure their grow room is sterile. To do this, you can use an Ozone Generator.
These can help prevent mold, predators, aid in sterilization and can disinfect a grow room in one go.
These generators are now inexpensive, so they can be a viable option. However, there is some caution required in their use. When using Ozone generators in confined areas, humans or pets shouldn’t remain in the vicinity. You should use a timer so you never enter a room where a large amount of ozone is present. If entering a grow room where an ozone generator is running, you need to hold your breath to prevent any ill effects.
These generators may sound like overkill, but for growers which have a grow room that may be hard to keep sterile, they make this straightforward.
Conclusion
Both sanitization and grow room sterilization are some of the most preventative measures and growers can take into having a successful grow room.
The chances of insects, viruses, and pathogens passing around your system are reduced.
While there is, plenty of effort in carrying this out, it is one of the very few things that cost nothing but deliver high returns.
Not only will your plants enjoy all this attention, but you may have spent a considerable amount of money on lighting and other equipment. This will remain clean, will run efficiently, and last longer.
You will protect your investment and have an increase in your system’s performance. The contribution of your time will be rewarded many times over.
Related Posts


Oscar Stephens
I am a gardening and tech enthusiast! Stumbling across the world of Hydroponic Gardening, Aquaponics, and Aeroponics by accident I've decided to create this website to put all of the best information I can find in one easy to navigate place. I'll continue to add more content as I discover new things!