One of the most crucial steps in a hydroponic garden that is often overlooked is getting the plants in the first place. There is lots of talk on pH levels and nutrients, but these are only suitable for existing gardens.
An up and running system is very different from a germination area, and with the speed that some plants will be growing, you will need to be continually germinating your seeds to keep your garden stocked with new plants to grow.
There are lots of people who skip this step and purchase seedlings that they can drop right into their system. Although this is more convenient, it does mean you might be limited to what you can grow.
When growing from seeds, your plants will bypass any trauma, damage, or passing on disease like they would as if they were raised in soil, or other mediums and then transplanted from an outdoor environment into your system.
One other aspect many growers forget is, they can get many more seeds for the price it costs for seedlings.
Although germination of seeds and seedlings can be pretty straightforward, and nature will do some of the hard work for you, there are some bits of equipment you need, terms you need to know, and some specific steps you need to follow to get the best germination rates.
When first starting to germinate from your own seeds, it will be a little more expensive because of the equipment you need to purchase, however, once you are on your way, this cost will be easily absorbed by the number of plants you can grow from seeds.
Hydroponic Germination Basics

One thing to note right at the start is, seeds can be germinated in soil, but it is advised against doing so. This is for a couple of reasons.
Bacteria can be passed over from the soil to your hydroponic system, and second, it can damage the roots of your seedlings because they will need washing before they are transplanted. It is far better to use a dedicated growing medium for this such as Rockwool or Coco coir/ Cocopeat.
One other thing which is worth mentioning is, there are a lot of places that classify seeds as Hydroponic Seeds, there is no reason to search for this because any seeds are suitable for use in a hydroponic system.
How to Germinate Hydroponic Seedlings Step-By-Step?
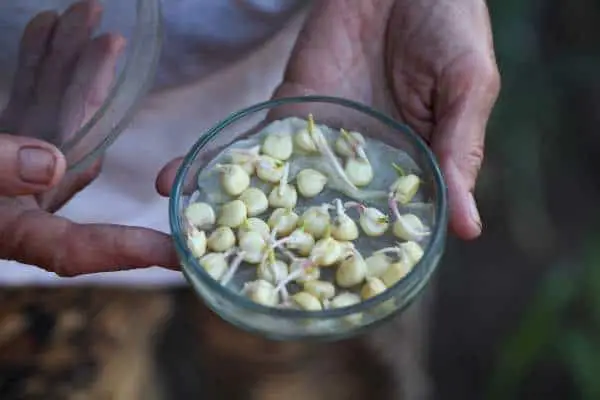
In order for hydroponic seedlings to germinate, they need three essential things: moisture, bright light, and warmth. Moisture is needed in order for the hydroponic seedlings to sprout. The bright light and warmth of around 70 degrees is what brings your seedlings „to life”. Using a growth medium made specifically for seed germination is the easiest way to germinate hydroponic seedlings. Rockwool cubes are very popular with hydroponic growers, my seeds always germinate when I use these cubes.
There are 5 parts in this phase and can be seen here:
- Seed coat – this is the hard outer shell of the seed
- Plumule – these are the first shoots or stems of an embryo plant
- Hypocotyl – this is the part beneath the stalks of the seed leaves which sits directly above the root system
- Radicle – this develops into the first root
- Cotyledon – these are the embryonic leaves which develop in seed-bearing plants. There will be one or more of these first leaves that you will see from germinating seeds. These help retain nutrients until more dominant leaves start to grow.
When the dormant state comes to an end, the Radicle will crack, and from this, there will be an early shoot. For this to happen, the seeds need to be in warm moist conditions. It is the function of the Cotyledon to provide the seeds with its first nutrients, which they would traditionally get from the soil, but in hydroponic systems, there is no chance for them to do this.
Propagation is the name given to the phase where seedlings start to become stronger, and when they develop stronger roots and their first real leaves. This phase of growth begins as plants emerge from the seed, and ends as they develop roots that have taken hold inside the germination plug.
When plants have developed two or three sets of real leaves, this is the stage when they can be transplanted into the system.
Equipment Needed For Hydroponic Seed Germination
Although there are a few types of growing mediums you can use for germinating seeds, it is worth running through them so you can see how they work in your hydroponic garden.
Coco Peat
This growing medium is a byproduct of the coco-growing industry. It comes from the coir fibers and is washed and heat-treated before it is made into coco peat products. Most often you find this in the form of large bricks.
The properties that are unique with this medium are, it is sterile, and has natural rooting hormones. It also possesses antifungal properties while being 100% organic. Coco peat can be used anywhere where you would previously use peat moss. Other properties are that it is capable of holding 8-9 times its own weight in water.
Coco peat can store and release nutrients for extended periods to plants, and it delivers fantastic oxygenation properties. Natural pH levels of coco peat are 5.0 – 6.8, so it is bordering neutral and slightly acidic. The one downside of using Coco Peat is some of the loose particles can be washed around your system. This can lead to pump blockages and reservoir sludge.
Coco Coir
This growing medium comes from the same processes as coco peat, but it isn’t ground into fine powder. It differs because it is the hairs that are found on coconut husks. It is most often used in passive hydroponic systems, but it can also come in the form of starter cubes or larger cubes for use later in your system.
Coco coir comes with all of the same properties as coco peat and is an excellent growing medium all around, but it can suffer from the same downside. Coco coir is not clean, and sediment can be washed off leading to the same pump clogs and reservoir sludge buildup. It can be rinsed before use to remove any of these loose particles.
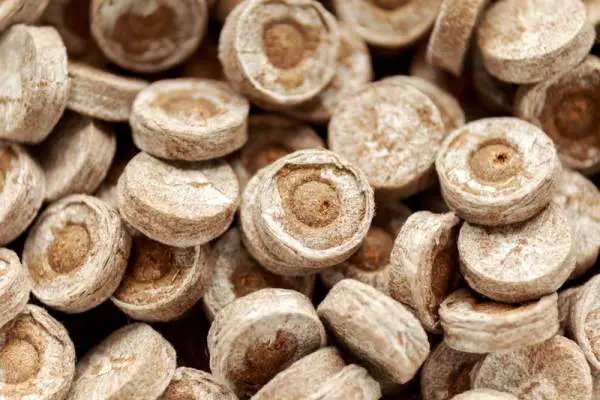
Rockwool
This growing medium isn’t natural and is made by the heating and spinning of specific silica-based materials into thin threads. This is the same process that roof insulation is made with, and should be treated with the same precautions during use.
Rockwool delivers an ideal material which when used, has almost perfect oxygen to water ratio while being pH neutral. Most often it comes in the form of cubes or plugs at around 1-inch square that are ideal for starting your seeds.
Once these are on their way to germinating, they are easily transplanted into larger cubes that have a hole precut to accommodate the plug. The smaller plugs are also ideal for transplanting into other growing mediums and are suitable for NFT, drip, and deep water culture systems.
Rockwool grow cubes have a pH of around 7.8 which is a little on the alkaline side.
These three mediums can be interchangeable, but for the remainder of this article, we will use Rockwool as the point of reference.
It needs noting, that because Rockwool is like insulation materials, it can make you itch, or breathing the fibers can be harmful. You only need to handle this material as much as required without any unnecessary touching.
Other items needed
- Containers that are capable of holding water, Germination tray with dome
- Chemicals for raising or lowering pH levels
- Seeds of choice
- Grow lights if germinating indoors
- Heating pad if temperatures are lower than required
Germinating Seeds Using Rockwool
Step 1: Hydrating and Stabilizing
Depending on the number of seeds you are looking to germinate, you might need one or more containers. These need to be big enough to hold your Rockwool cubes once they have been soaked in water.
If water levels are too high, the seeds can drown because of the excess water. The seed needs to be at a height where the water can wick up the cube to the seed, but also, there is air available for the seed from above.
At this early stage, you can use distilled water or regular faucet water. Both will work equally as well as each other. Once you have the water in your container, you need to test the pH levels. There are a few growers who recommend adding a half-strength or lower nutrient solution, but at this stage, it isn’t necessary, and the seeds won’t benefit that much, and in some cases, once nutrients are added to sprouting seeds, they have died.
Using either a pH test kit or a pH testing meter take a reading. Depending on the type of water you use, it might read up or down, but you might find the water gives a reading of 7.4. This means you will need to lower the pH by using your pH-down solution.
The pH you need to aim for is as close to 5.5 – 6 as you can get. At no point should you let the pH drop to below 5.5. The fibers of the Rockwool can become damaged when this happens.
Insert your starter cubes and let them soak for around an hour. By this time, they will have swollen by soaking up the water from the container.
Rockwool cubes have the ability to hold the perfect balance of air to water ratio. If there is unnecessary squeezing, this will change this ratio and can cause deformation of the cube. The cubes are capable of remaining wet for a few days without any additional watering.
If you are presoaking your cubes in pH-balanced water before moving them to another tray. Don’t discard the water, and keep it in a sealed bucket for later.
Step 2: Planting Seeds into the Cubes
Depending on the supplier of your Rockwool cubes, you might have the ones which come without holes already in the cubes. If this is the case, all you need to do is make a hole in the top which is to a depth of no more than a quarter of an inch deep.
Now, all you have to do is take a couple of seeds and carefully place them into the hole. They won’t fall to the bottom so you will need a small device to gently push them to the bottom of the hole. Once done, you can gently push another little piece of Rockwool into the hole to cover the seeds. Make sure this is only tight enough to block light from entering.
It might seem backward, but what you do now is cover the container. This will leave the seeds in darkness, but it will also retain moisture and prevent evaporation. It is this environment that is critical for seeds to germinate correctly.
You can purchase dedicated germination trays that come with plastic domes, this isn’t necessary. Other growers also slide their trays inside a Ziploc bag to retain moisture, though does mean your trays will be much smaller. All you need is an upturned tray of the same size or something that can sit across the tray without pushing on the Rockwool cubes.
No matter what you use to cover your tray, be it a Ziploc, or a plastic dome, your trays need to sit in darkness throughout the germination period. The area where you have your seed trays laying should be around 68F, if your growing/ nursery area is less than this, then this is where the heating pad comes into use. A few degrees above will be fine, but it is below which really causes the problems.
Step 3: Let Nature Take its Course
While the seeds are germinating in this phase, you do need to check water levels on a daily basis depending on how warm your environment is. This is one of the advantages of using Rockwool because you might find they don’t require any, or minimal watering during this time.
This is where you can use the reserved water from the first step, simply add enough to keep the blocks moist as water levels drop.
This is also why it is advisable not to add any nutrients at this stage. Sprouts are becoming stronger, and only really need nutrients once they are in your system.
As you added more than one seed to each hole (there will be mortality rates or slow growers), you might find that both have sprouted. It will be tempting to try and remove the one and replant it, but you should avoid doing this. It can cause damage to the other sprouts rooting systems.
This stage is usually reached in around 3 – 4 days depending on the growing conditions. When you see the first true leaves emerging, it is time to select the smaller of the two shoots and cut off the more minor one’s level with the top of the cube. It is a sacrifice you need to make, unfortunately.
Once plants have reached this stage, it is time for them to start receiving light to help them grow. Many people use sun-facing windows to deliver this light, and although ideal for the first introduction to light, it can cause problems later.
If you use the sun or grow lights, it is the red-light frequency that will accelerate seedlings’ growth. When using the sun, three hours per day is enough, and the times that contain most of the red light is between 6.00 am, and 9.00 am or later in the early evening from around 4.00 pm until 6.00 pm.
Using the window method will require the trays to be turned so the seedlings won’t lean toward the light. Additionally, once your seedlings are getting bigger, they will need up to 15 hours of light per day.
This is where a sun-facing window leads to problems, there might not be enough sun. When this happens, and seedlings don’t receive enough light, they grow weakly and leggy. Once this happens, they begin falling over, and in many cases, it is something they are unable to recover from.
Overhead grow lights solve this problem because you can set the timer for 15 hours per day, and because the lights are overhead, the seedlings won’t lean to the side. Additionally, as they are receiving a full quota of light, they will grow much stronger and healthier.
One other thing to note is that seedlings need time to rest from light, so when they have had their quota, the nursery area should have sufficient darkness.
One final caution is to make sure any grow lights are positioned far enough away from the top of the seedlings so as to not scorch them (depending on the light type). As they grow, the lights will need raising. Watering might become more frequent as the seedlings begin taking on more fluids, and if there is heat from your lighting fixtures.
Step 4: Transplanting
The first steps of germination to when you can transplant into your system can take between 2-3 weeks.
Rather than waiting for this time limit, you can check the bottoms of your Rockwool cubes, and when you see the roots are starting to protrude from the bottom, then you can transplant. This can be a good indication because if you leave them too long, they can begin to get root bound in the cube as this will be their only source of moisture.
Once you have reached this stage, you can clear a space in your system for your new young plants. You can transfer the whole plant along with the Rockwool cube into your growing media where you should cover the top lightly.
Because the plant’s rooting system has been focused on the cube for moisture, it needs a chance to naturally seek out another water source, so, to enable them to do this, you can top water them for the first few days.
Why Haven’t all My Seedlings Survived?
There are numerous reasons why not all seedlings will survive, and not all can be explained. But, depending on plants being grown, there are temperature differences that must be accounted for. if you have cool weather plants, and warm weather plants as seedlings in the same environment, then this could be too much of a temperature swing for either type of plant.
Other things you need to be wary of are as follows:
- Media drying out – seeds need to be in a warm moist environment to germinate. If they dry in between watering, this can kill them or prevent them from sprouting.
- Retain high humidity – this is essential to retain moisture. Humidity domes or an upturned tray on top of your grow tray can help maintain moisture and humidity. A transparent dome while under lights will also be beneficial.
- Too wet – if you over water, or your Rockwool cubes become too wet, this can lead to seeds rotting before they have a chance to germinate properly. To make sure you don’t over water, you can spray inside your grow tray rather than pouring water. Many grow trays have ridged bottoms so the grow cubes won’t be standing in pooled water. If a too wet situation happens, you can have what is called damping off. Here, some molds and fungi form during the propagation phase and cause your seedlings to lose the structure of their stems and lay flat.
- Don’t overfeed – when you start feeding with nutrients, this should only be when you see the first sets of true leaves. The EC of your water should be at a maximum of 0.8 – 1.2. During the early stages of life, plants will obtain all their nutrients from the cotyledons, and it is only when these first true leaves show they become dependent on external sources of nutrients or fertilizers.
Transplanting Tips
This might appear a simple exercise, but at this stage, plants will be susceptible to transplant shock. This isn’t only from the pressures of being removed from the grow tray, but also from being placed into a new environment. This initial shock can take them a few hours to recover from.
Seedlings are heat sensitive, and even more so when being transplanted. This will include their new life under stronger lighting, but also the temperature of your nutrient mix.
The ideal time to transplant is when your seedlings are ready to be watered. The grow cubes will be slightly moist and will have shrunk back a little in your grow tray. This will make them easier to remove, and when they should be placed into a system that has running water.
Seed Tips
Although there are lots of seeds that are suitable for germination, some more exotic plant seeds do have special requirements. Here is a brief overview of what you might find when looking for seeds.
Pre-soak seeds – some growers advise to presoak seeds before germination. This would allow the seed coat to become saturated and break open easier. However, because hydroponic germination methods are in the mid 90%’s compared to soil, this is not recommended unless the speeds specifically require soaking.
Scarification – many fruit plant seeds might require their exterior to be weakened before germination. In nature, this is the function of animals or birds. To mimic this in hydroponics, this type of seed will require some form of scarification. This might include the seeds being run along with a metal file, rubbed across sandpaper, cracked lightly with a hammer, or even cut with a knife. If you have any seeds of this nature, be sure to only carry out this process on the seeds you will be using. Once they have been scarified, they will not store very well.
Seed inhibitors – because some seeds expect to lay dormant over the winter period, they have built-in inhibitors that prevent them from germinating too soon. Some of the inhibitors can be found in the way of Abscisic acid. This would decrease in the seeds as winter comes to an end, so the seeds are ready to sprout. To overcome this, you can place this type of seed in a moist growing medium and place it in a refrigerator for four weeks. This process is called stratification, and it is by doing this that enzymes break down and mimic what happens in the wild. Temperate native plants that require this winter season will need this process. It might be uncommon, but it is useful knowing how you can work around it.
One other inhibitor which can be found in desert plants is phenolic compounds. This prevents the seeds from germinating until there is sufficient moisture, This inhibitor is water-soluble, and once it has been broken down, then the seed is able to sprout. All it requires for these to sprout is sufficient moisture.
Temperature – We have spoken about temperature, but it is worth mentioning the upper heat limits because this can prevent seeds from germinating, or even killing them. If the growing media rises above 90F, then you will unlikely see any action. You can check this with a hydroponic thermometer quite easily. In many cases, this happens in greenhouses where growers germinate, but having the ideal temperature is crucial.
Conclusion
There can seem to be a lot of information to take in when it comes to hydroponic seed germination, but in practice, it is quite straightforward when you follow the requirements. The amount of equipment is minimal, and the only things are to make sure you have an area that you can use as a nursery.
In many cases, it can be something as simple as a shelf racking system where you can store your trays and is away from your system grow lights. If you use this, you can easily keep your seeds covered until they are ready to be introduced to grow lights, and the amount of shock they will face during transplanting can be reduced.
With the length of time required before transplanting, you can have seedlings at various stages and always have a continual supply of plants that you can add to your system. This makes the system more efficient overall.
Growers also find that growing their own plants from seeds, is not only cost-effective but also gratifying to complete every single stage of their plant’s growth.
Related Posts
Oscar Stephens
I am a gardening and tech enthusiast! Stumbling across the world of Hydroponic Gardening, Aquaponics, and Aeroponics by accident I've decided to create this website to put all of the best information I can find in one easy to navigate place. I'll continue to add more content as I discover new things!